Follow Me!

Showing posts with label styling. Show all posts

Wednesday, May 22, 2013

Ends Make Inches Tip #1: Soak Your Hair Ties and Bobby Pins in Oil


Happy Hump Day lovelies!

Lately, I have been doing some thinking. When folks talk about their hair journeys, the focus is always on the major changes. I mean how often have you heard about stretching, protective styling, using less heat, etc? Probably more times than you care to think about. However, I'm finding that the further along that you go in your hair journey, it is the little things that add up and can potentially do damage to your hair. More often that not, we don't really think about what that hair tie, what those bobby pins, or what that comb is doing to your hair. So, I wanted to make a series of quick hits that illustrate some of the things you should think about as you go about the business of styling your hair.

If you guys are anything like me, with the mercury rising you have probably started to bun consistently. Personally, I prefer to bun using a good hair tie (sans the metal clip in the middle) and a handful of bobby/hair pins. However, my hair ties and bobby pins present a problem: friction. It is that friction that rubs against my hair and causes the breakage I see when I take either of these items out. Of course there are ways around this. You can substitute the bobby pins for a Goody spin pin or bun without a hair tie. But what if you don't want to do either of those? Well, you still have another way to use these items without the breakage.

Soak your hair ties and bobby pins in oil.

It can be any oil that floats your boat: olive oil, castor oil, coconut oil....whatever makes your boat float. With the bobby pins (assuming you are using pins that have the rubber ends and are coated), that oil reduces friction you get when you place them in your hair (or take them out) resulting in no breakage. When you soak your hair ties in oil, not only do you reduce friction but you ensure that the section of hair that your hair tie is wrapped around stays moisturized (meaning: your hair tie won't take the moisture away from your hair) and minimizes breakage.


Pretty cool, huh? As you can see, oftentimes the little things we do to our hair on a daily basis can make a huge difference in retention. What do you think about this tip? Have you tried it? What were your results?


Wednesday, February 27, 2013

YES!! A Successful Braidout!!

This post is just a quick hit but I had to share!


Who would have thought that something so simple could be so difficult to master? I finally got a decent braidout! I had to tweak the products a bit (I used a combination of Shea Moisture Curl and Style Milk and ORS Lock & Twist Gel) but I finally got the definition and hold that I wanted. I pretty much did this braidout on dry hair trying to rescue the busted braidout I had before but I cannot wait to try this product combination on damp hair.

Anyway, enough chatter. Check out my results!


Tuesday, February 26, 2013

Wash Day: February 23, 2013

Happy Tuesday lovelies!

This post is a little late because my Monday was SOOOO busy! Either way, I did do a wash day this week (my last 'wash' day was a co-wash followed by airdrying my hair because during that particular weekend, I was stuck in lab...the entire weekend) and I wanted to report what I did.

I really want to take the next few wash days to get my braid out technique down since I plan on rocking them this spring/summer. As per usual, I washed my hair using Shea Moisture Moisture Retention shampoo and steamed my hair with ORS Hair Repair Nourishing Conditioner. Let me say that my hair felt MAGNIFICENT! It was just what my hair needed. I then applied Qhemet Biologics AOHC to me hair and then air dried for 20 minutes or so- long enough for my hair to go from sopping wet to damp.

I then got to trying out this braid out thing.

This wash day I decided to use Shea Moisture Curling Souffle for the product that would provide 'hold' for my braidout. For some reason, I had a jar of it underneath my sink, so I decided to give it a shot. So, section by section, I applied the curling souffle and plaited my hair until I had 8 Miss Celie braids done. I then put perm rods on my ends (to provide a little curl at the end so my ends aren't bone straight) and sat under the dryer.......for 3 HOURS!!!


So, here's the thing with that curling souffle: the texture is garbage (it's like snot), it's wayyy too sticky (my hands had a layer of sticky on them once I finished), and it takes forever to dry. Even after sitting under the dryer for 1 hour.....2 hours...my plaits still felt damp. After that 3rd hour, I called it a day and went to bed. Thank goodness I had all of Sunday to myself or else I would have been really worried about that braid out.

So Monday morning rolls around and I take my plaits out. I will say that the curling souffle made for some really defined waves...not that the held for very long. My hair frizzed pretty quickly. Le sigh. Yeah if you were thinking of trying the curling souffle...don't.


I plan on doing a wet set/damp set braid out again this week. This time I will try it using what usually works for me for bantu knot outs and the like: Shea Moisture Curl and Style Milk w/ a dab of Ecostyler gel.

Thursday, January 24, 2013

When I Get Tired of Wearing My Hair Straight, Option #2: Dutch Braid/Dutch Braid into a Side Bun

Happy Thursday lovelies!

This week, I wore my hair straight for a hot two days before I got tired of wearing it straight (eh). So today, I decided to wear my hair in a messy Dutch braid (call it what you want but it still looks like a cornrow to me). However, that was not to be. The end of my Dutch braid just wouldn't lay right (ain't nobody got time be be fussing over the tail end of a braid)....so I put it in a bun.

Either way, doing a Dutch braid doesn't take too long to do (about 5min max) and I found it pretty easy to do. It's a quick option for your hair should you tire of the straight look.


Wednesday, January 23, 2013

A Method Revisited: The Silk/Saran Wrap

As you guys may have noticed, I have incorporated the silk/ saran wrap into my regimen. The silk wrap method is pretty simple: after your hair is dry (via rollersetting, wet wrapping, etc.), you wrap your hair and wrap saran wrap around it. Next, you sit under a hooded dryer for ~15minutes or so. This method is used to not only make your hair straighter but it also makes it well....silky (hence the name silk wrap).

Anyway, I tried the silk wrap earlier on in my HHJ (before I had my hair cut short) after a rollerset...and it was a HOT MESS. My hair was not straighter nor was it silky....it was puffy and dry. I didn't know what I had did wrong and I didn't care to find out. All I knew was that rollersets and silk wraps were the bane of my existence. They were simply things that worked for other people but not me.

On a whim, I decided to try the silk wrap again following my last relaxer day and today my surprise, it actually worked! The only difference was that this time, I did a silk wrap following a wet wrap and flat iron. I also made sure to wrap the saran wrap around my head at tight as I could stand and I stayed under the dryer for exactly 15minutes (any longer and you risk sweating...which will completely mess up a saran wrap. ) As you guys saw, it turned out pretty darn good. This was all the convincing I needed to include saran wrapping in my straightening regimen.

I personally love silk wrapping because it takes some of the bulk of my hair. Most of the time after flat ironing, my hair still has some...heft to it. It can be pretty annoying when you want your hair to have slightly less volume. Another cool thing is that you can refresh a days old press using the silk wrap method. Add a little moisture, wrap your hair, add saran wrap, sit under the dryer and BAM!!! Your hair is oh so silky smooth for at least a few more days!

Check the results!


Tuesday, August 30, 2011

The Art of Blowdrying (It's Really Not That Tricky)

The weekend I had the urge to wear my hair straight for a day or two. Crazy right? What's even crazier is that I decided to straighten my hair...by myself....after being out in the sun for the better part of the day. Can you say tired!?

Anyway, I am learning that there is an art to blowdrying your hair. Back when I was younger and didn't know any better, I would blow dry my hair using a regular blow dryer (not a ceramic/tourmaline one) with a comb attachment that you can pick up at Wally World. I wouldn't detangle my hair beforehand thinking that the comb attachment will do the job and I definitely didn't put any product in my hair. I can't tell you have many comb attachments I have broken using that method.

The end result of all that poor hair styling? Big, poofy blow dried hair. I looked like Alex the Lion from Madgascar.


I never really quite knew what to do with my hair after those blow drying sessions. SMH.

Well thank goodness for knowledge!

I found that proper blowdrying consists of 3 things:

1) the correct tools

2) the correct products

3) the correct technique


On Saturday, after washing and DCing my hair, I applied Kinky Curly Knot Today (moisturizing leave in), Aphogee Keratin and Green Tea Restructrizer (I spray this on my hair whenever I'm using heat), and One N Only Argan Oil (heat protectant) to my hair. I then proceeded to blow dry my hair w/ my FHI blowdryer using the method that Salon Cabelo describes (yes with the Denman brush and everything):


The result? Non poofy, non cottonball like hair. If I wasn't trying to go for a bone straight look, I could have stopped at the blow drying.


The point of this horrendously long post is this: when blow drying your hair it is important to have the right tools. However, it's equally important to use the right products for you hair (I know for me I have to have a great leave in and a great heat protectant. Otherwise you can forget it) as well as a great technique. Once you get those three things in a magical, glitter driven configuration-you will have perfect blow drying results every time! :)

Friday, August 19, 2011

Earrings (and things)

Happy Friday lovelies!!

This week has been so busy for me now I'm back in the swing of things in lab. I just wanted to stop by and just fill you in on what has been going on.

As you know, I have been bunning for the majority of the summer. There's nothing wrong with that right? It's a great protective style and it's low manipulation. Everything should be good, right?

WRONG!!!

I have found that buns have the tendency to make you look like Plain Jane if you aren't careful. And we all know what happens if you look like Plain Jane, right? You get bored with bunning and then you're on the hunt for another protective style. So, I have decided to start accessorizing more to get rid of this bunning boredom. I figured a good place to start would be with earrings. I have 2 piercings in each ear (got my ears pierced as a baby and again at 16) and I barely wear earrings. I need to change that. Although I have just started to really wear earrings on a daily basis, I am finding that they add much needed oomph to basic, boring buns (hooray!).

I just want to show you a few pics of my buns w/ earrings. Keep in mind that my earring collection isn't extensive (yet!) but I plan on adding more earrings as the months go by!


*SN: Sheesh. I need to expand and get some gold earrings, huh?*

Friday, July 22, 2011

I FINALLY Figured It Out!!

Slicking down my edges when I'm wearing a bun (or just wearing my hair back in general) has always been the bane of my (hair) existence.

I have tried every manner of gels, glazes, and pomades and have met minimal success with each. Some would slick my hair down but as soon as I come into contact with the slightest bit of moisture, my edges would pop back up. Grrr. Do you know how frustrating that is!?????Today, however, has marked the end of my frustration. I've pretty much found that the key to keeping your edges slicked down lies on 1 key product: moisturizer.

Yep. That's it. Moisturizer. If your edges are moisturized enough, the easier they are to beat brush into submission. Who freakin' knew?

Now, I can't tell you what moisturizer to use since every head of hair is different but I can tell you what moisturizer worked for me:


Darcy Botanicals Coconut Lemon Transitioning Creme. Oh.Em.Gee. I put some of this on my edges and followed up with the olive oil Ecostyler Gel. Edges are laid down! Even after walking in the sauna that is Birmingham, AL in the summertime, my edges have stayed put!

So there you have it. If your edges seem to laugh at any gel, pomade, or glaze you put in your hair, try moisturizing it first. It may make a world of difference.

Happy Friday ladies!

Monday, July 18, 2011

Look of the Day (7/18/2011): Braidout Ponytail

Happy Monday lovelies!

The weekend went by entirely too fast and now it's time for another work week. Le sigh.

This past weekend, I plaited my hair for a braidout today. Now, I fully intended to wear a braidout today I promise I did. However, my braidout had me looking too much like Ms. Ross the Boss (*starts humming 'It's My House'*). Ordinarily, I like big hair but today, I simply wasn't feeling it. Plus, I don't know about yall but we have been experiencing a heat wave so any style that keeps my hair off of my neck is a good one.

So here is my braidout ponytail. Definitely a good Monday morning look!


Tuesday, July 12, 2011

Mini Twists: Day 3

At this point I have had my twists in for 3 days and I LOVE them!!! They aren't frizzing up or unraveling at all. I have been keeping them moisturized w/ my Shea Moisture products and sealing w/ One N Only Argan Oil.

I have been doing some research abou twists trying to determine if they are a protective style or low manipulation style. I've found that, depending on who you ask, it can be either or. However, in my humble opinion, twists are a low manipulation style. I say this simply b/c your ends are out and you have to take great care to keep your ends moisturized. Now twists can be made into a protective style if you wear them in a bun or some other style to keep you ends tucked away. However, as it stands, twists are low manipulation.


Today, after an experiment gone wrong (apparently I DO have to set my ends on flexirods every night if I want to have curly ends), I'm wearing my twists in a bun (thus, making them a protective style). I suppose that's a good thing. I had a serious case of hand in hair yesterday and today I'm feeling extremely low key. Also, it has been extremely humid here lately so it just may be better to keep my hair up.

Anyway, here is how my hair is looking today. Still fresh and happy! :)


Sunday, July 10, 2011

This Is What Happens When......


.....I have nothing but time on my hands.

Yesterday I had decided to do absolutely nothing. I was gonna lounge around my apartment and like it. Yep that's what I was gonna do. I was doing great on achieving nothing until I went on YouTube and looked up videos for mini twists. That was the wrong move. They looked so cute and low maintenance that I wanted to give them a try. I figured that I have enough texture left in my hair to make twists that actually stay twisted and decided to test that hypothesis. Lo and behold...I actually can do mini twists!! A little over 3 hours later (many thanks to 'Clueless', 'The Wedding Planner', and Keeping Up w/ the Kardashians for keeping me entertained), my twists were complete and I was putting flexirods on the ends of the twists to get them to curl at the end.

I didn't use a lot of product for the twists, just some Shea Moisture Coconut and Hibiscus Curl and Style Milk and some EcoStyler Gel (the green one). I plan on keeping these in for a week or two since they took so daggone long to complete.

Well....what do you think?

Monday, July 4, 2011

4th of July Weekend and My Hair

Happy 4th of July everyone!

I hope all of you are having an amazing day, eating lots of yummy food, and watching some amazing fireworks. Currently, I'm laid out on my aunt's couch because I have eaten entirely too much. So, I figure it's best not to move...a lot.

So for the holiday weekend, I drove to SC to my grandparents house. My mom and brother drove down from VA and I met up with them in SC too. Now I love visiting my family, I promise I do. However, every time I come to SC I have to make some serious decisions as to what I'm gonna do with my hair. Let me explain. My grandparents live in Middle-of-Nowhere, SC (read: the country) and I have always had an issue with the water at their house. This is mainly because it's well water. It smells like eggs and even as a little girl, I didn't want that water touching me. Well, I have to shower of course but I refuse to let that well water touch my hair with its contents unknown. Nope, I'll just wait to go back to my good ol' Birmingham water. At least I know what's in that.

Anyway, I decided to keep my hair simple. With my trusty banana clip, I wore 3 styles over the course of my time here.


1) Banana clip bun. I absolutely love this bun and it was perfect for my day at the beach with my family. Besides, SC is so flippin hot and humid, I couldn't picture having my hair just out and about.


2) Braid out bun (please excuse my red teeth. I had just finished a wild cherry Icee. It was delicious.) I tried doing a braid out and it didn't turn out the way that I had planned so I bunned it. It was a good thing I did b/c we spent the day playing Putt Putt golf. In the hot sun......yeah.


3) Bantu knot out ponytail? (I did a bantu knot out and put it back with a banana clip. I'm not sure what you'd call that but that's what it is). It wanted to wear a bantu knot out for the family cookout today but then I went outside and knew I wasn't gonna wear my hair out. At all. What you see it the end result.


All in all, I have enjoyed my time w/ my family, meeting my baby cousins, talking, laughing, and carrying on. Now I'm ready to head back to B'ham to give my hair some much needed TLC.

Friday, June 3, 2011

I am a Braidout Queen!!

...well not really lol

Happy Friday everyone! I can't believe I actually have free time to post something today (I have been incredibly busy-and stressed- trying to get this thesis proposal together)! Anyway, this past week I started doing braidouts. Why it took me so long to do them, I have no idea. All I know is, it dawned on me that my hair is actually long enough to do them. Check it out:


Pretty cool huh? That is actually the second braid out that I have done. The first one was quite tragic. I pretty much learned the hard way that uh....you really shouldn't mess with the braid out too much. Doesn't turn out good. Not at all. Once I figured that out, it has been smooth sailing. Braidouts are a low/lowered manipulation style. I just braid my hair at night and undo in the morning. No combing or anything!

Since I know you're dying to know what products I used and how I did it, I'm gonna go ahead and tell you.

1) I separate my hair into 6 sections.
2) To each section, I apply Shea Moisture Curl and Style Conditioning Milk (just enough to moisturize it but not enough to weigh my hair down).
3) I braid my hair so that I end up with 6 plaits.
4) Place stain rollers at the end so my ends aren't straight
5) Spray Shea Organics Hold and Shine Moisture Mist (just a little).

In the morning, I undo the plaits with a little bit of oil (I mainly place the oil on my ends) adjust my hair so that I can get a headband on and head out the door! Easy peasy! I haven't noticed any breakage (I'm guessing that's because I'm basically moisturizing and sealing every night) and it allows me to enjoy my hair!

Tuesday, April 12, 2011

My Hair: 4/12/11


Happy Tuesday everyone! I just wanted to stop by with my hairstyle of the day. I actually took the time to do a bantu knot out! Last night, I sectioned my (dry) hair into 8 parts (2 in the front, 2 in the middle, and 4 in the back). I placed a light gel onto each section and proceeded to make my bantu knots, securing them with a bobby pin. I unraveled my bantu knots this morning and voila! Instant cuteness!

If you can't tell, I love wearing curly styles during the spring and summer. It just looks so carefree and relaxed to me.

Well what do you guys think? Yay or nay?

Tuesday, February 15, 2011

Tree Braids and Other Random Things....

It has been awhile since my last update. It hasn't been because I'm busy though. I was just bored with my hair. I had been straightening and bunning my hair since October and quite frankly I was tired of it. About a week and a half ago I got some tree braids put in. At this stage in my journey, tree braids and cornrows are pretty much the only options for my hair in terms of braids with extensions. My hair is pretty much too long for micros and kinky twists. Anyway, have a look:


Ok, here's the run down on tree braids. I pretty much call them glorified cornrows...which they are. My hair is in small cornrows and has the braider braids about 4 strokes or so then pulls out hair which gives the illusion that I have a weave. So the pattern looks like (- equals braiding > equals hair pull out):

--->-->--->........( and so on and so forth)

It's actually kinda cool when you think about it. Since my hair is in cornrows, I can keep my scalp clean with the ORS Herbal Cleanse Dry Shampoo and I can spray leave in onto my braids. It's pretty low maintenance and I tend to keep the hair that's out in a bun since the hair gets tangled easily. The style takes about 3 to 4 hours to create, lasts between 6 and 8 weeks, and can be done with human or synthetic hair.

My only issue with this style is that the added hair sheds A LOT! I think the shedding is really evident because my hair is in a straight style. I may had to compare what happens when I use wet and wavy hair ( or something with some sort of curl) to make an accurate assessment about that. Also, you have to really be aware how tight the braider is braiding your edges b/c these braids are all up on them.

So far, however, I love tree braids and they are giving me a welcome break from my hair. I'm trying to decide if I should stick with tree braids over the summer or just do cornrows (w/o extensions). Time will tell....

Sunday, January 9, 2011

Rockin' the Curls

Yesterday I talked about using flexirods on dry hair to get a nice curly style. Well last night I did just that so that I could wear my hair curly for church today! I have to say that I am absolutely loving the results. My curls are so bouncy and fun! I love them! I definitely gonna keep doing this!

However, one thing I will not do anymore is use 16 flexirods to set my hair. I had the hardest time finding a comfortable position to sleep in--and I likes my sleep so yeah. From here on out, I'm using 4 of these bad boys.


Anyway, without further ado.....my hair


Thursday, November 11, 2010

Walmart Got Me Again!!

Damn you Walmart and your reasonably priced services!!!!


Tonight after work, I made a quick run into Walmart to pick up some of that Creme of Nature Argan Oil Conditioner that I wanted to try out. I had noticed that the Smart Style salon was open and stopped in to look at some of the hair products they had on display.

That's when it happened.

I was lured in by all this talk of a basic roller set costing only $14.95 (I'm a sucker for a good deal). Even when the price went up to $24.95 because of my hair length, I was still hooked. Shoot, in a state with no Dominican salons, 25 bucks is a daggone good deal! I walked on over to the shampoo bowl and allowed the magic to happen. I wound up getting a wash, blowout, and flat iron for $26.95 (my hair is thick, we would've been in there all night waiting for my hair to dry and I don't have that kind of time).

Let me tell you, my hair is GORGEOUS!! It's all soft and shiny and straight. I tried to take a pic of it but my camera was acting like a jerk. I say all that to say, I was pleasantly surprised. This stylist may be the stylist I go to when I don't feel like doing my hair...which has been often because it takes a lot of effort to do my hair now that it's longer. I also may go to this stylist for my touch up. This salon uses Mizani relaxers so it may be worth a shot.

Anyway, I dunno about the Walmart salons where you guys are, but I think I may have found a great thing!

Sunday, October 17, 2010

Time for Something New....Time for Something Different

I was sitting in my apartment last night, playing in my hair. I had relaxed it on Friday ( 1 week ahead of schedule) and was loving the length. However, I felt like something was missing. Like it was lacking a little....oomph.

Did I want to color it? Nah. I wanted to cut it. But....I've been working so long and so hard for the length I have now, I couldn't bear to part with it. So want did I want to do to my hair? BANGS!!! I want BANGS!!

Now mind you, I have always done the little side swoop thing so getting bangs is stepping out of the box for me. Anyway, today after church, I went to Head Start Hair Care and got my bangs for the grand total of.....$7.00.

Check 'em out:


They make me feel a little more grown...more vampy.....more something. So far I am loving them!!

Sunday, September 19, 2010

I'm Such an Alabama Girl....

Well not really lol

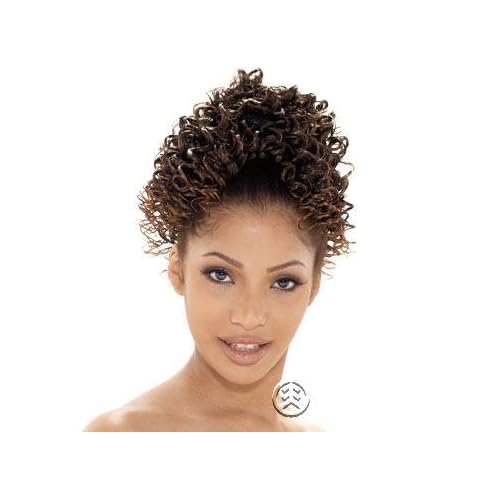
I'm just posting about the new phony pony I purchased this weekend. I got it at my local BSS and spent about $10 for it. It's FreeTress Shake N' Go ponytail in Alabama Girl. It looks like this:


As you can see, I am a fan of curly phony ponies. I dunno why...maybe because they give me more leeway as to how straight my real hair has to get. Anyway, I love this pony. It gives such a cute curly style. I should note that I don't wear my pony the way that the model does. When you plop a pony on the top of your head like that, it looks like a pony plopped on the top of your head. I mean I know it's a phony pony but it doesn't have to look like one! Maybe once I figure out this whole posting vids on YouTube thing, I can make a tutorial.

That's all I wanted to update you guys on. It's another phony pony style for those who are interested in them.

Happy Sunday!

Thursday, September 16, 2010

The Bun Sessions: Buns for NL/SL Hair

Many people (myself included) think/thought that their hair must be a certain length before they can start bunning. I will say that this partly true. I mean, yeah you can't bun when your hair is ear length but your hair doesn't have to be bra strap length either. I came across this tutorial on edaluv's Youtube page. She explains everything beautifully so that those of you still aiming to reach great lengths can do so.

Just in time for the cooler months!